Archive for the ‘Projects’ Category

Water Heater Repair, Part 3

This post is where I expand on step 3 from my earlier post on how to fix a water heater.

The water heater heating elements are tightened very well by the factory. I could not get that thing to budge.

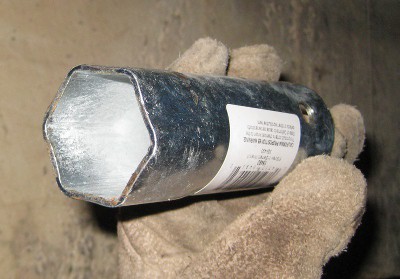
I had read that there are special wrenches/sockets made for loosening water heater elements, so I bought one ($5).

picture of a water heater element wrench

It has a hole drilled in the non-business end so that you can get some leverage. It is not a very big hole, so all I could find to fit in it was a large allen wrench or a screwdriver.

I tried for an evening to take out the element. No luck.

Someone suggested Liquid Wrench to help loosen it. Maybe it had rusted or corroded in place.

One evening of that. No progress.

Another evening of that. Still no progress.

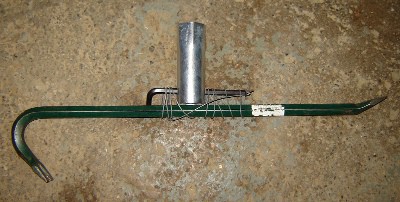
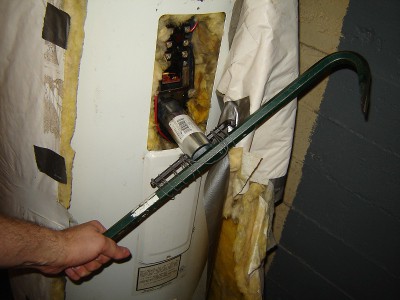
Then I decided that I needed more leverage. So I strapped a crowbar to the wrench. I used about a two-foot length of 10-gauge steel wire. The allen wrench was still through the element wrench, so I wrapped the wire around the allen wrench and crowbar.

picture of a crowbar strapped to water heater element wrench for leverage

The element came free on the first try.

Leverage is your friend.

picture of a crowbar strapped to water heater element wrench for leverage

I think I didn’t need Liquid Wrench at all, because the threads were fine. If you are trying to loosen water heater elements, your first step should be more leverage, not special solvents.

Especially because you don’t want those solvents in your supply of drinking or cooking water.

Truly I say to you, whatever you bind on earth shall have been bound in heaven; and whatever you loose on earth shall have been loosed in heaven.

Matthew 18:18

Water Heater Repair, Part 2

This post is where I expand on step 1 from my earlier post on how to fix a water heater.

You need a multimeter. You must be able to measure resistance somehow. I know, it’s futile. Just ignore the bellowing guard.

Here goes:

Check for a failed element

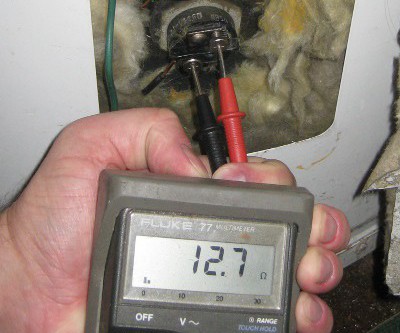
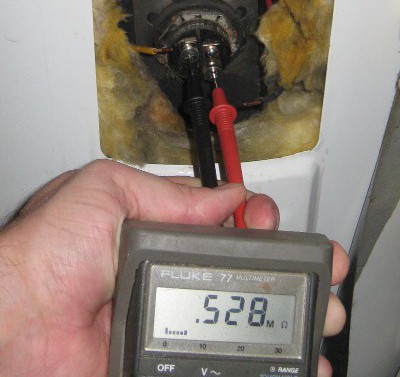
  • Disconnect both wires from the heating element. Measure the resistance across the element (from one screw to the other). It should be a dozen ohms or so.

    picture of a multimeter measuring resistance of a good water heater element

  • Repeat for the other element.
  • If either one is zero or a large number, that element is bad.

    picture of a multimeter measuring resistance of a bad water heater element

(more…)

Water Heater Repair, Part 1

You may recall from an old blog post that I had some water heater trouble. I paid a plumber $90 to press the reset button on the water heater.

At least it fixed the water heater.

For a few days.

Then the water got cold again. But I knew what to do – go press the reset button.

Ahh, hot water again.

Then the water got cold again. Reset button… still cold water.

Hmm… circuit breaker?

Ahh, hot water again.

After a few days of pressing the reset button and resetting the circuit breaker EVERY SINGLE DAY, I decided something must be wrong. The water heater should not trip the circuit breaker (or blow the fuse). But I already spent $90 on this problem and I was not going to make it $180.

I looked up instructions on the internet for how to fix an electric water heater. They looked simple enough. And they worked!

All I spent was about $30, and now I will share the wealth of knowledge with you.

Before I fixed the water heater, I was intimidated by water heaters. All I had heard before was horror stories about how so-and-so’s water heater exploded and blew the room to smithereens. So I had avoided them and feared them.

But they’re not that bad – nothing to fear. It is just a big bucket of water with two resistors and two switches. (for non-engineers, replace resistors with heaters)

Note: These steps are for electric water heaters. I still fear gas-fired water heaters.

All I had to do to fix it was find which resistor or switch was bad and replace it.

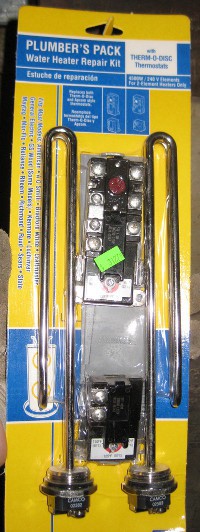
picture of a set of heating elements and thermostats for electric water heaters

The resistor is a heating element and the switch is a thermostat. I looked up the model # and stuff for the heater and found it had two heating elements of 4500 watts each. Lo and behold, the local big-box store had a set of two elements and two thermostats, and it was only slightly more expensive than a single heating element.

I bought the set because then, no matter what was wrong, I would have what I needed.

The symptom I was experiencing was that the water would be hot but not for very long. All the how-to sites said that meant the upper element was bad. If the lower element had been bad, I should have had not-so-hot water but more of it.

The amount of heat remains the same:
upper element = concentrated,
lower element = diluted.

If you’re a non-engineer and still reading this – don’t worry, it gets easier.

Now on to the steps. If you want pictures, come back for the next installment of writing about this water heater project.

Step 1: Find the bad element. WAIT! Turn off power to the heater. Then find the bad element. This is the trickiest step, so come back for more details in Part 2.

Step 2: Drain the water out of the tank. Believe me, it is a lot harder if you skip this step. Note that the water supply should be turned off before you start this step.

Step 3: Replace the bad element.

Step 4: Fill the tank back up and turn power back on.

Step 5: Run the water for a while because you will have stirred up sediment and your water may be gray or cloudy for several minutes.

And that’s all there is! How to fix your water heater in five easy steps!

It took me about 15 minutes for step 1, 3 hours for step 2, 1 hour for step 3, and 45 minutes for steps 4 and 5. That’s a total of 5 hours, not including time at the store buying parts.

Step 2 took a long time because I had to do it twice. Learn from my experience – if only the upper element is bad then you don’t need to drain the tank all the way. Do it in half the time by draining only half the tank.

Step 3 took a long time because the element was very stubborn. So stubborn, in fact, that it gets its own blog post (Part 3).

To be continued . . .

I know your deeds, that you are neither cold nor hot; I wish that you were cold or hot.

Revelation 3:15

Insult Depot, Part 2

Continued from my earlier post

Chapter 5: Back into Danger

I had successfully brought home all the cabinets necessary for the bathroom. But I had neglected to inspect them before purchasing them. My wife, however, quickly noticed what looked like a scratch on one of the cabinet doors. It wasn’t a scratch – it was a line of extra paint. If it had been a scratch, then we couldn’t say that the cabinets came that way. But since it wasn’t a scratch, my wife thought it would be best to exchange the cabinet for an unblemished one.

I put off returning the cabinet to the store, mainly because we were busy with other activities the next few evenings, but also because I dislike returning things. That and I couldn’t find the receipt. Saturday morning, I loaded the cabinet back into the minivan and headed back to the store. I put the cabinet on a flat-bed cart and wheeled it to the customer service desk. They took it back and told me to go pick out a new cabinet. So my 5-year-old helper and I did just that.

Chapter 6: A Happy Ending

I found the cabinet we needed. There was only one left, and I knew it wasn’t the upside-down one I had rejected earlier in the week, because this one had the plastic straps around it and that one didn’t. As I was grabbing the cabinet to load it onto the cart, an employee approached.

This employee was a male, somewhere around 50 or 60. As he was walking up to me, he asked “Are you alright with that?” To which I replied “Yep, thanks.” And this employee did things right: he believed me and left me alone. He just kept right on walking and let me do my shopping, for which I was glad.

We took the cabinet back up to the customer service desk. The lady there had already processed everything and didn’t even need to look at my receipt (God answered my desperate prayer of “Please let me find this receipt!” that morning just before I left). In order to avoid another return, she convinced me to let her open the box and inspect the cabinet for damage or blemishes before we left the store. Aside from some scuff marks, which we agreed would probably wash off, the cabinet was in fine shape.

We installed both cabinets later that morning. “We” being me and my 73-year-old helper, not me and my 5-year-old helper. And the bathroom looks much better. And my wife is pleased with the cabinets.

You will surely wear out, both yourself and these people who are with you, for the task is too heavy for you; you cannot do it alone.

Exodus 18:18

Which Floor Do You Want?

I put sheet vinyl flooring in the bathroom. It is the least favorite of my flooring types. By least favorite I mean least favorite to install.

Here are my rankings, in order of easiest to hardest to install:

  • Vinyl tiles are the easiest to install but they are also the easiest to mess up.
  • Laminate flooring is easy to install. Plus it is not permanent – you can remove it with no destruction to the sub-floor.
  • Ceramic tile is nice because the grout will fill in many mistakes. But it requires the most surface prep and can be messy.
  • Sheet vinyl is awful because of the large size (unwieldy to maneuver) and messy glue.

I have not installed hardwood floor, but I assume I will like it slightly less than laminate.  I plan on never installing carpet myself, so I’m not going to rate its ease of installation.  (Carpet, drywall, and now sheet vinyl are on my list of things that are not do-it-yourself).  Also, thinset and grout for ceramic tile can be messy, but they clean easily. Vinyl glue is messy and does not clean easily.

Sub-Floor

Ceramic tile needs a flat, solid surface. That would not have worked in the bathroom that now has the sheet vinyl flooring. That floor was not level and not even, so it would have taken quite a few fixes to get the sub-floor in good shape for the ceramic tile. But for the sheet vinyl, we just put down luan plywood so that the surface is smooth. That left slopes and dips and such, but the vinyl conforms to that pretty well.

My Experience

The worst part about the sheet vinyl was the gluing part. The sheet was cut to fit the room exactly. The room is not square – it is more like a L shape. So I couldn’t just unroll it, because no matter which way I rolled it, it was longer than the part of the room where I was rolling it.

The theory is that you spread the glue on the floor and then put the sheet of vinyl on top of that. Then you press it down with a heavy roller and you’re done. If your room doesn’t change width at all, then it might be that easy for you. But if your room has angles or changes widths, think twice about sheet vinyl (or contract it to a professional installer).

Because I could not unroll my vinyl in one shot, I couldn’t put all the glue down at once. The vinyl is thick enough so that it won’t conform nicely. If your roll of vinyl is 8′ 3″ and your walls are 8′ 2.5″, then it’s not going to unroll. It just gets stuck and scrapes your wall. But the vinyl is thin enough that it will tear if you pull on it and it will crease (and tear) if it gets folded.

For my L-shaped room, I had to put the vinyl in place first. Since I couldn’t unroll it, I had to carefully bend it. Once it was in place, I peeled back one leg of the L, put the glue down, and put the vinyl back in place. Then I had to peel back the unglued part of the vinyl. That was both the corner and the other leg of the L. So I had to do two folds or bends without creasing it. Watch the corners – those are the first places that the vinyl starts to rip. But I got it in place, spread the glue on the floor, and restored the remained of the vinyl to its proper place.

All that had to be done with the door closed, because the door opens inward. And the glue gets all over the handle of the trowel but it does not come off very easily. And it has fumes, so I had to keep the window open, which is normally a bad thing to do when it is freezing outside.

Finally, the floor was glued. Then I had to roll it with the 100-lb roller thingy. There was once spot that had a bubble. I would roll over the bubble and the bubble would be pushed along. But as soon as I flattened it there, it would pop back up over where it started. There are no bubbles with any other flooring types.  They cooperate nicely.  But sheet vinyl does not.

One Chance Only

And the last knock against sheet vinyl is that it is all or nothing when you install it. With the vinyl squares, if one goes on crooked you can peel it up and try again. If a square gets damaged, you can throw it out and use the next one and you’ll lose only a dollar or so. The same is true for ceramic tile or laminate flooring or hardwood flooring. But sheet vinyl is not so nice. Once you put it down, it’s not coming back up. Theoretically, you could try to pull it off the glue and re-set it.  But I don’t want to even think about that.

And if it gets damaged in the process, you’ve lost $100-$200. Or you can try to repair it, which will either look bad or create seams. And the reason to get the sheet vinyl is so there are no seams. And don’t forget about the cutting of holes.  I had to cut holes in the sheet for this like the plumbing and the heat vent.  You have to measure very carefully and cut very carefully.  Otherwise you ruin the sheet.  With tiles (ceramic or vinyl), you just mess up a single tile at worst, and it’s not that much of a setback.  If you mess up multiple tiles trying to get a single hole or notch cut, then maybe you should re-think the idea of installing it yourself.

Seams and Gaps

The vinyl tiles (peel and stick) are the simplest to install and are great for small spaces, not much square footage. The problem is that you need to align the edges perfectly. Ceramic tile is similar, but the edges don’t need to be perfect because there are gaps between tiles and they are filled with grout. So slight offsets are okay, because they will be helped by the grout. But with vinyl tile, there is no grout because there are not supposed to be any gaps. If one tile is skewed ever so slightly, there will be a noticeable gap somewhere in the floor.  If the tiles are not perfect, you will notice it.

Conclusion

There’s just too much that can go wrong, too much to worry about, when installing the sheet of vinyl.  Main complaints: the glue is annoying and the big sheet is awkward.  I like ceramic tile for bathrooms.

Then he built the walls of the house on the inside with boards of cedar; from the floor of the house to the ceiling he overlaid {the walls} on the inside with wood, and he overlaid the floor of the house with boards of cypress.

1 Kings 6:15

Nail Board Craft

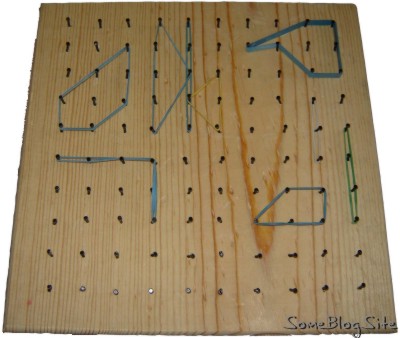
One of the other craft things we did over the Christmas break was rubber-band nail boards.  These are the boards with lots of nails/pegs so that someone can stretch rubber bands in various shapes.  This was our do-it-yourself/build-your-own craft for the week.  The kids like playing with these at the children’s museums (musea?), so my wife thought they would like to have their own.

Cost:

  • 1×12 board (4′ long): about $5
  • a box of 1″ panel nails (250 count): about $3
  • a box of rubber bands: about $1

Total: $9

Time:

  • cut and rout boards: 15 minutes
  • mark points on the board: 5 minutes
  • pound nails into the board: 30 minutes

Total: 50 minutes

The kids spent about 30 minutes playing with the boards after they were done, so it’s a little pricey at $9 per child-hour of play.  But I expect the rate to come down as they play more.

Details:

I started with a 1×12 board and cut it into a couple of 12×12 squares so that each child could have his own board.  Then I routed the edges so that they were not so sharp – better child-friendliness.

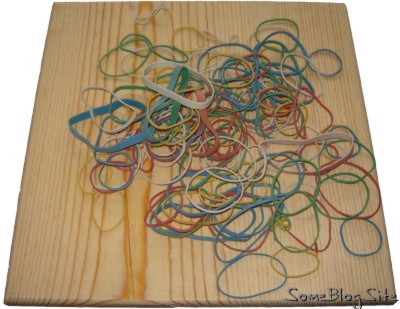
start of the nail board craft

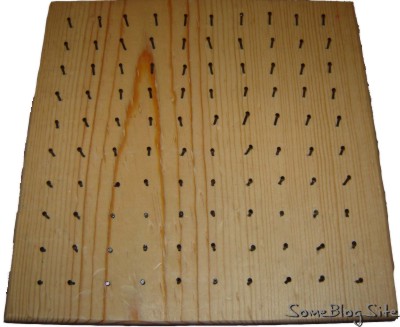
Then I marked a grid of 100 dots to show where the nails were to go.  I spaced them 1 inch apart, as that worked out rather nicely for the 12×12 square.  Then the 3-year-old helped me pound in the nails.  I started by drilling starter holes with a small drill bit, but it wasn’t worth it.  I thought I could just push the nails into the holes and then the child could nail them the rest of the way.  But it didn’t work that way.  It was easier for me to just start nailing – hit the nail a couple of times and then let the kid finish the nail.  I did have to watch it though and tell him when to stop pounding.  Otherwise he would put the nail all the way down into the board.  Since the nail is slightly longer than the board is thick, that would be a problem.

nail board craft with nails

The nails did not end up to be very straight, but that’s not all the 3-year-old’s fault.  I did the second board by myself and the nails were similarly crooked.

end of the nail board craft

The words of wise men are like goads, and masters of {these} collections are like well-driven nails; they are given by one Shepherd.

Ecclesiastes 12:11

Fishing Pole Craft

I decided to make a craft with/for the kids. Here are the details.

  • Magnets: 12 for $1 = 8.3c per pole
  • Poles: 2 for $1 = 50c per pole
  • Washers: 30 for $1 = 3c per fish
  • String: free from the garage
  • Paper: free from just about anywhere

Total per fishing pole: about $0.60
Time spent occupying the kids’ attention: 1.5 hours (includes helping with construction and also playing time)
Not a bad deal when compared to any commercial ventures intended for entertaining kids for that amount of time…

The pole was a dowel from the local big-box hardware-type store.  They come in 4-foot lengths, so I bought one, cut it in half, and had two 2-foot poles for the kids.  I then stapled (using my construction-type stapler, not a standard paper stapler) a 3-foot length of string to the end of each pole.

materials used to make the fishing-pole craft

I took the magnets that we bought and drilled a hole in the middle of two of them (one per pole).  The magnets were the soft (plastic) type, not the hard (ceramic) type.  The ceramic type are going to be more powerful, but also more brittle and I wouldn’t want to drill a hole in one of them.  I used a small drill bit, the type used for wood, for the magnet.  The size was just slightly larger than the string, so that I could thread the string through the hole.  I did not put the bit into a drill – I just twisted it by hand.  Yes, the magnets are that soft.  After threading the string through the hole, I tied a knot in the end to keep the string from unthreading itself.

pole and string assembled

While I was doing that, the kids were coloring fish that I had cut out of paper.  The fish were between two and three inches long.  Once the children were finished coloring the fish, I taped the washers to them.

completed fish

And then?  We tested everything – put the fish on a chair and have each child try to pick up a fish using the magnet on the end of the pole.  They worked adequately, although I would have liked stronger magnets because the magnets we got don’t have much of a grip.  They pick up the fish most of the time but they fall off easily.

The kids slightly enjoyed fishing with the poles.  What they really like doing with the poles is pretending they are bows, as in bows and arrows.  There are no arrows, but that doesn’t stop them.  Since I made the strings longer than the poles, the children started having fun wrapping the string around the pole.  Then they noticed if they wrapped only the end of the string around the other end of the pole, that left some extra string in the middle.  That extra string resembled a bow, so they started pointing it at things and shooting “arrows”.

Now suppose one of you fathers is asked by his son for a fish; he will not give him a snake instead of a fish, will he?

Luke 11:11